Well here we sit on the precipice of yet another new year. I am sure if you are like me you are probably thinking over options for your New Year's Toast. While I am a big fan of Champagne, I also enjoy many, many other cocktails. (Yes I know sparkling wine is a tradition). So here are a few ideas for you to consider as you ring out 2014 and ring in 2015.
Classic Cocktails are always a great option and I am not going to give you blow by blow recipes as you can Google them or if you are one of my many faithful you will have seen many posts on these here.
Whiskey Cocktails
The Manhattan
The Old Fashion
The Rusty Nail
The Hemingway Highball
Vodka/Gin Cocktails
The Martini
Vodka Press
Gin Rickey
Gin Fizz
The Cosmo
That should get you started and if you are like me and planning on staying in this year and simply having a few friends over, imagine how much fun you can have crafting these classics while your friends sit around being amazed!
One last thought and I should not even need to remind you, Don't Drink and Drive!
Cheers
The Professor
Tuesday, December 30, 2014
Tuesday, December 23, 2014
The Christmas Gift
As adults it seems Christmas Gifts are really not all that important as most of us had stories to tell about some gift we received that we never understood. The Chia Pet, or sunglasses for bike riders or that shirt that all you could do was say "What the hell were they thinking?"
Swapping stories with my group of cronies by the Pit and I recalled this story from my youth.
The Christmas Gift
I remember as a young boy of eight there was a Christmas party at my church where each child was supposed to take a gift for the grab bag. The idea of a grab bag is that everyone throws a gift in and then everyone takes a different gift out and has a surprise gift. I guess the surprise being the receiver does not know who the giver is, or something like that. There were two boxes, one for the boys and one for the girls and all of us kids placed our gifts into the appropriate boxes as we entered the room.
The limit for spending on the gift was a quarter of a dollar. Yes, I know twenty-five cents does not sound like much, however keep in mind that this was 1966! In 1966 you could buy an ice-cream cone for a nickel, so imagine what twenty-five cents would buy. And imagine is exactly what I did. What treasure would I obtain as I dove into the huge box at the front of the room! Images of marbles and toy soldiers rolled and marched through my head.
My mother always took special care to pick out the perfect gift for such occasions. She could always find a gift for a quarter that normally would cost fifty or even seventy-five cents. Most of the time I wanted to keep what I was putting in the grab bag for myself but that was not allowed.
The lady in charge told us to form two lines, boys on the left and girls on the right. We immediately and swiftly moved into two single file lines; poised in attack formation.
As the lady said, now one at a time go get a gift; everything seemed to move in slow motion. Kids, both boys and girls, hurled themselves to the front of the room and lunged at the grab bag boxes! One girl was knocked down, and two chairs fell over! Wrapping paper, which mothers so carefully applied to the gifts earlier that day was flying everywhere, as I stood frozen in a state of shock and disbelief. Part of me said run, run to the boxes, while the other part of me heard my Mom say, “Take your turn”. Turn, what turn! All that was in front of me was mass confusion. I then thought, well if everyone put a gift in box there still should be one left when I get to the box. I relaxed and waited.
Then all at once it was over and the lady said to me, “Son did you get a gift”? I shook my head and said, “No”, in a timid voice. She motioned me to the box and as I peered over the edge I saw one tiny cylindrical shaped object not much bigger that a tube of Chapstick.
I picked up “my gift” and thought it was awful heavy for such a small gift. I started to take off the paper, and watched in shock as twenty-five pennies bounced off the floor. The lady and I picked up the pennies and she said something like “Oh, now you can buy whatever you want”.
I heard some kid in the back laugh and I decided to leave the party early. When I walked in the door my Mom knew something was wrong and when I asked about the party I started to cry. Mom looked at my hands and said, “Keep your coat on we are going to the store”.
I never even had to say a word. Somehow my Mom had figured the whole thing out. She even gave me another quarter to go with the twenty-five pennies. I do not remember what I bought with the money, but this has to go down as the worst Christmas gift I ever received that turned into one of my fondest Christmas memories.
Monday, November 24, 2014
Smoked Chex Mix
If you have followed this blog you already know I am not afraid to smoke anything. Cinnamon Rolls, Ritz Crackers and Cheese to name a few.
So when two of the KC Usual Suspects (J.W. and C.H.)came to me with the idea of smoking Check Mix the challenge was accepted.

I am not 100% sure of the recipe that C. used, however it looked to be about the same as I have used in the past. Also don't be afraid to try different combinations and if you look at the Check webpage they have dozens of recipes.
The process is simple, heat your Pit to around 250 and use a mild wood. (I choose apple) Smoke for about an hour and fifteen minutes stirring every 15 minutes or so.
This will make a great addition to your holiday parties and even a great addition to your holiday gift baskets.
You can make huge batches of this and freeze for use at a later date.
Keep Smoking My Friends
Randy
So when two of the KC Usual Suspects (J.W. and C.H.)came to me with the idea of smoking Check Mix the challenge was accepted.
I am not 100% sure of the recipe that C. used, however it looked to be about the same as I have used in the past. Also don't be afraid to try different combinations and if you look at the Check webpage they have dozens of recipes.
The process is simple, heat your Pit to around 250 and use a mild wood. (I choose apple) Smoke for about an hour and fifteen minutes stirring every 15 minutes or so.
This will make a great addition to your holiday parties and even a great addition to your holiday gift baskets.
You can make huge batches of this and freeze for use at a later date.
Keep Smoking My Friends
Randy
Tuesday, October 7, 2014
The Sauce is the Boss
Yes I realize that this is the saying of Sweet Baby Ray's BBQ Sauce, however I have found this to be an absolute truth when BBQing.
While I make my own sauce I really enjoy two commercial brands. The previously mentioned Sweet Baby Ray's.

and another sauce I have just recently discovered through a friend, D.R. Full Moon, a Kansas City BBQ Sauce.


I don't know a lot about the Full Moon sauce except it is really good when using as your BBQ Glaze. I enjoy Sweet Baby Ray's as a general purpose sauce, meaning on eggs, hamburgers etc.
Now most of you who follow this blog know I have a great sauce for glazing as well. (see below)
Now the key I have found when applying sauce is to apply when you are hot and then let the meat cool while the glaze settles in. I sometimes do this by firing up a BBQ Grill as I finish up on the pit and then when the grill is its hottest more the meat over and glaze with sauce while turning the grill off and keeping it closed.
Keep Smoking My Friends
Randy
Randy's BBQ Sauce
Ingredients
1 1/4 cups ketchup, preferably organic
1 cup dark brown sugar
1/4 cup molasses
1/4 cup pineapple juice (or you can sub apple cider vinegar)
1/4 cup water
1 tablespoon worchestire sauce
2 1/2 teaspoons ground mustard
2 teaspoons smoked paprika
1/2 teaspoon garlic powder
1/4-1/2 teaspoon cayenne pepper (use less if you don't like the heat)
1 1/2 teaspoons kosher salt
1 teaspoon pepper
1/8 cold water mixed with 1 tablespoon corn starch (optional)
Combine all the ingredients except the water and corn starch mixture in a medium size sauce pot. Bring to a boil and reduce and simmer for five minutes or until all the sugar has dissolved. If you like a thicker BBQ Sauce add the water and corn starch mixture. Simmer until desired thickness is reached, but watch closely. It thickens really fast! Serve immediately or store in fridge.
While I make my own sauce I really enjoy two commercial brands. The previously mentioned Sweet Baby Ray's.
and another sauce I have just recently discovered through a friend, D.R. Full Moon, a Kansas City BBQ Sauce.
I don't know a lot about the Full Moon sauce except it is really good when using as your BBQ Glaze. I enjoy Sweet Baby Ray's as a general purpose sauce, meaning on eggs, hamburgers etc.
Now most of you who follow this blog know I have a great sauce for glazing as well. (see below)
Now the key I have found when applying sauce is to apply when you are hot and then let the meat cool while the glaze settles in. I sometimes do this by firing up a BBQ Grill as I finish up on the pit and then when the grill is its hottest more the meat over and glaze with sauce while turning the grill off and keeping it closed.
Keep Smoking My Friends
Randy
Randy's BBQ Sauce
Ingredients
1 1/4 cups ketchup, preferably organic
1 cup dark brown sugar
1/4 cup molasses
1/4 cup pineapple juice (or you can sub apple cider vinegar)
1/4 cup water
1 tablespoon worchestire sauce
2 1/2 teaspoons ground mustard
2 teaspoons smoked paprika
1/2 teaspoon garlic powder
1/4-1/2 teaspoon cayenne pepper (use less if you don't like the heat)
1 1/2 teaspoons kosher salt
1 teaspoon pepper
1/8 cold water mixed with 1 tablespoon corn starch (optional)
Combine all the ingredients except the water and corn starch mixture in a medium size sauce pot. Bring to a boil and reduce and simmer for five minutes or until all the sugar has dissolved. If you like a thicker BBQ Sauce add the water and corn starch mixture. Simmer until desired thickness is reached, but watch closely. It thickens really fast! Serve immediately or store in fridge.
Tuesday, September 9, 2014
Bacon Wrapped...
I was having a group of Usual Suspects over for the labor day weekend and wanted to make some great smoked appetizers. I choose Smoked Bologna, which I had smoked previously, and two new items.
Stuffed Jalapeno Peppers Wrapped in Bacon and Tater Tots, both plain and some stuffed with cheese and wrapped in Bacon.
Stuffed Jalapeno Peppers
I started with some larger peppers hoping they would not be as hot and cored them removing the white and seeds. I then stuffed them with my smoked meatloaf (previously prepared and smoked) and wrapped with with a whole piece of bacon. I then placed each in an aluminum pan for smoking.
I had them on the pit for about two hours at 225 - 250 adding smoke the entire time. I also sprinkled some of my basic BBQ Rub on top. I then sliced them into pit sized pieces after allowing to cool for 20 minutes.The real key to being done is when the bacon is nice and crisp.

They turned out really good, however they were HOT! I really could not eat them, however those Usual Suspects who were fire eaters really ate them up.
Bacon Wrapped Tater Tots.
For the Tater Tots I tried making small incisions in each tot and putting a small piece of cheese inside, however this was very time consuming and I really could not get enough cheese into each tot to make a difference. The next time I will put a larger chuck of cheese on the tot and then warp in Bacon. I used about a third of a piece of bacon on each tot and sprinkled basic rub on top. (again using an aluminum pan) I smoked at 225 - 250 for two hours adding smoke the entire time. Again the key to the readiness of the tots is crisp bacon.

Even with the cheese a non factor these turned out awesome! Word to the wise if doing these make about three times as many as you need as I ate six before anyone arrived ;)
The plain tots were also great and I sprayed the aluminum tins with cooking spray prior to smoking. I used the same formula, sprinkling my basic rub on top and smoking at 225 - 250 for about two hours. I added smoke the entire time and when the tots were crisp you know they are done.
Keep Smoking My Friends
Randy
Stuffed Jalapeno Peppers Wrapped in Bacon and Tater Tots, both plain and some stuffed with cheese and wrapped in Bacon.
Stuffed Jalapeno Peppers
I started with some larger peppers hoping they would not be as hot and cored them removing the white and seeds. I then stuffed them with my smoked meatloaf (previously prepared and smoked) and wrapped with with a whole piece of bacon. I then placed each in an aluminum pan for smoking.
I had them on the pit for about two hours at 225 - 250 adding smoke the entire time. I also sprinkled some of my basic BBQ Rub on top. I then sliced them into pit sized pieces after allowing to cool for 20 minutes.The real key to being done is when the bacon is nice and crisp.
They turned out really good, however they were HOT! I really could not eat them, however those Usual Suspects who were fire eaters really ate them up.
Bacon Wrapped Tater Tots.
For the Tater Tots I tried making small incisions in each tot and putting a small piece of cheese inside, however this was very time consuming and I really could not get enough cheese into each tot to make a difference. The next time I will put a larger chuck of cheese on the tot and then warp in Bacon. I used about a third of a piece of bacon on each tot and sprinkled basic rub on top. (again using an aluminum pan) I smoked at 225 - 250 for two hours adding smoke the entire time. Again the key to the readiness of the tots is crisp bacon.
Even with the cheese a non factor these turned out awesome! Word to the wise if doing these make about three times as many as you need as I ate six before anyone arrived ;)
The plain tots were also great and I sprayed the aluminum tins with cooking spray prior to smoking. I used the same formula, sprinkling my basic rub on top and smoking at 225 - 250 for about two hours. I added smoke the entire time and when the tots were crisp you know they are done.
Keep Smoking My Friends
Randy
Wednesday, August 20, 2014
Smoked Turkey Breasts
While I had smoked whole turkeys before I was wanting some sliced smoked turkey for sandwiches so I stopped at one of my local markets and picked up two bone in 15 pound turkey breasts to smoke.
I started by injecting with a mixture of apple juice and my Cluck-Cluck Rub and let set for a couple of hours. Some rave about using a brine, but I have yet to try this as my luck with injecting has been great.
I then rubbed the birds with yellow mustard and more of the Cluck-Cluck Rub and then added a half stick of butter and more rub in each cavity. This is an essential step in my opinion to keep the turkey moist. (true also with a whole turkey) You can also add some sliced apple and onion if you wish as this also helps with moisture.
I heated up my pit to 250 - 275 and used hickory and cherry wood for the smoke. I cooked uncovered for an hour and covered. As I have said in other articles when smoking poultry it is very easy to over smoke causing a bitter taste in your bird.
I cooked for two hours more and the finished product as you can see turned out great. I rested the birds for about 30 minutes before slicing.

In the picture the skin looks a little dark, however it was crisp and you could easily bit through it. This is key to smoking any poultry as you get a lot of taste in the skin!
The turkey sliced very nice and made great wraps!
Keep Smoking My Friends
Randy
I started by injecting with a mixture of apple juice and my Cluck-Cluck Rub and let set for a couple of hours. Some rave about using a brine, but I have yet to try this as my luck with injecting has been great.
I then rubbed the birds with yellow mustard and more of the Cluck-Cluck Rub and then added a half stick of butter and more rub in each cavity. This is an essential step in my opinion to keep the turkey moist. (true also with a whole turkey) You can also add some sliced apple and onion if you wish as this also helps with moisture.
I heated up my pit to 250 - 275 and used hickory and cherry wood for the smoke. I cooked uncovered for an hour and covered. As I have said in other articles when smoking poultry it is very easy to over smoke causing a bitter taste in your bird.
I cooked for two hours more and the finished product as you can see turned out great. I rested the birds for about 30 minutes before slicing.
In the picture the skin looks a little dark, however it was crisp and you could easily bit through it. This is key to smoking any poultry as you get a lot of taste in the skin!
The turkey sliced very nice and made great wraps!
Keep Smoking My Friends
Randy
Saturday, July 26, 2014
Smoking, This and That
For those who have been fortunate to either be following this blog or physically following me you know that the last month has been a whirl wind of smoke! I have had the pit fired no less that 7 times with cooks of Ribs twice, 3 separate brisket cooks, 5 pork shoulders, several meatloafs, salmon, sausage jalapeno bombs and the beat goes on.
So for the last few weeks I have been smoking several different types of items and making some other dishes off the pit as well as experimenting with new side dishes.
For this weeks blog I wanted to touch on a few new items.
First I was looking for a new snack to serve to some of the usual suspects. I really enjoy smoked cheese and crackers, however the temps have been just to hot to smoke cheese So I decided on smoking the crackers.

As you can see in the pic I choose Ritz Crackers (after all would Andy lie? Everything taste better on a Ritz!)
I simply added the chosen amount of crackers to a pan, fired my Pit trying to keep the temp below 200 and poured as much smoke as possible into the crackers for 1 1/2 to 2 hours.
The outcome was fantastic! Went well with all types of cheese and made for a great happy hours.
Side of the Week:
I am always looking for new side dishes and lately I have been in an I...Talian mood.
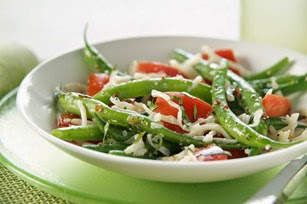
I choose summer salad of Green Bean and Mozzarella Cheese. The most important point and I can not stress this enough is to use all FRESH ingredients.
Ingredients:
2 Cups Fresh Green Beans cooked and drained
6 (I used about twice that many) Plum or Cherry Tomatoes Halved
1 Cup Fresh Mozzarella Cheese Grated
1/3 Cup Fresh Basil (I used about 6 leaves)
1/3 Cup Italian Dressing of your choice
Toss all ingredients in a bowl and refrigerate for at least an hour.
Keep Smoking My Friends
Randy
So for the last few weeks I have been smoking several different types of items and making some other dishes off the pit as well as experimenting with new side dishes.
For this weeks blog I wanted to touch on a few new items.
First I was looking for a new snack to serve to some of the usual suspects. I really enjoy smoked cheese and crackers, however the temps have been just to hot to smoke cheese So I decided on smoking the crackers.
As you can see in the pic I choose Ritz Crackers (after all would Andy lie? Everything taste better on a Ritz!)
I simply added the chosen amount of crackers to a pan, fired my Pit trying to keep the temp below 200 and poured as much smoke as possible into the crackers for 1 1/2 to 2 hours.
The outcome was fantastic! Went well with all types of cheese and made for a great happy hours.
Side of the Week:
I am always looking for new side dishes and lately I have been in an I...Talian mood.
I choose summer salad of Green Bean and Mozzarella Cheese. The most important point and I can not stress this enough is to use all FRESH ingredients.
Ingredients:
2 Cups Fresh Green Beans cooked and drained
6 (I used about twice that many) Plum or Cherry Tomatoes Halved
1 Cup Fresh Mozzarella Cheese Grated
1/3 Cup Fresh Basil (I used about 6 leaves)
1/3 Cup Italian Dressing of your choice
Toss all ingredients in a bowl and refrigerate for at least an hour.
Keep Smoking My Friends
Randy
Thursday, July 10, 2014
Our First Event
One of my first goals when diving into the world of BBQ was to compete in BBQ contests. However, as I have been smoking for a couple of years now I have now found real enjoyment out of cooking for others just to see the enjoyment they get out of eating all the different items that come off the Pit.
With this in mind I accepted my first offer to cater an event. After some vigorous negotiations I was hired to do a wedding rehearsal dinner. The guest list looked to be 55-60 so with that in mind I I started planning months in advance.
A couple of challenges arose early on. First I had no experience in cooking for that number of people and had no idea how much food I would need. Second, I had to decided on a menu not only for the numbers, but one I could prepare. Last I would need to travel to get to the event site and needed to be able to haul the necessary equipment without the need of a trailer.
I started doing some research and found that if you were serving sandwiches you could calculate about a 1/2 pound of meat per person. That made it sense and also led to my option of smoking brisket and pork shoulder as these make excellent sandwiches and can be prepared to feed a larget number.
I figured about 30 lbs of brisket and 36 lbs of pork shoulder would be more than enough. That came out to two briskets and 4 pork shoulders.
I smoked the briskets a day in advance of my departure and would smoke the pork on site. Yes you are correct that heating the brisket on site and making it moist would prove a challenge. (more on that later)
I arrived on site and set up camp.

As you can see in this picture I found an extra smoker on site (also more on this later)
I started on the day of the event at 6:00 in the morning by injecting the pork shoulders and reading my smokers. At 8:00 I fired the Pits and rubbed the meat. The smoke arrived about 8:30 which is when I put on the meat.
I was smoking around 250 - 275 and was looking to add smoke for about the first three hours. I has smoked the baked beans the day and had coleslaw to make so that would keep both Central Patti and I busy for a few hours.
I covered the port shoulders after the smoke was done and went about getting other things done. I glazed the pork about an hour prior to the start of the event and put the beans in the oven for warming and thickening.
Now as for the brisket I laid it out in a warming pan and with a combination of my Magic Mix and Beef Broth attempted to make sure the beef slices were moist, but not soggy. This turned out only marginal to me, however the brisket went very fast once the guest started eating.

I thought the overall cook was average, however I had lots of positive comments, met a lot of great people and made some new friends. I also learned a lot about catering an event and hope to do another soon.
Keep Smoking My Friends
Randy
With this in mind I accepted my first offer to cater an event. After some vigorous negotiations I was hired to do a wedding rehearsal dinner. The guest list looked to be 55-60 so with that in mind I I started planning months in advance.
A couple of challenges arose early on. First I had no experience in cooking for that number of people and had no idea how much food I would need. Second, I had to decided on a menu not only for the numbers, but one I could prepare. Last I would need to travel to get to the event site and needed to be able to haul the necessary equipment without the need of a trailer.
I started doing some research and found that if you were serving sandwiches you could calculate about a 1/2 pound of meat per person. That made it sense and also led to my option of smoking brisket and pork shoulder as these make excellent sandwiches and can be prepared to feed a larget number.
I figured about 30 lbs of brisket and 36 lbs of pork shoulder would be more than enough. That came out to two briskets and 4 pork shoulders.
I smoked the briskets a day in advance of my departure and would smoke the pork on site. Yes you are correct that heating the brisket on site and making it moist would prove a challenge. (more on that later)
I arrived on site and set up camp.
As you can see in this picture I found an extra smoker on site (also more on this later)
I started on the day of the event at 6:00 in the morning by injecting the pork shoulders and reading my smokers. At 8:00 I fired the Pits and rubbed the meat. The smoke arrived about 8:30 which is when I put on the meat.
I was smoking around 250 - 275 and was looking to add smoke for about the first three hours. I has smoked the baked beans the day and had coleslaw to make so that would keep both Central Patti and I busy for a few hours.
I covered the port shoulders after the smoke was done and went about getting other things done. I glazed the pork about an hour prior to the start of the event and put the beans in the oven for warming and thickening.
Now as for the brisket I laid it out in a warming pan and with a combination of my Magic Mix and Beef Broth attempted to make sure the beef slices were moist, but not soggy. This turned out only marginal to me, however the brisket went very fast once the guest started eating.
I thought the overall cook was average, however I had lots of positive comments, met a lot of great people and made some new friends. I also learned a lot about catering an event and hope to do another soon.
Keep Smoking My Friends
Randy
Friday, June 20, 2014
Bacon Wrapped, Mozzarella, Pineapple, Onion Rings
Yes that is not only a mouth full to say, but also to eat.

However, if you take the time to prepare and cook them you will not be disappointed.
Now I am not going to try and take credit for inventing them, only perfecting them ;)
Here is where I learned how.
Harry Soo is one of the top 10 BB Pit Masters in the world and has dozens of great ideas on his pages.
To things I learned is that wrapping the rings takes a lot of patience (thanks Central Patti) and I cooked over direct heat adding a light smoke to my pit. Then moved to indirect heat after the bacon looked crispy to finish them off.
Keep Smoking My Friends
Randy
Randy
Friday, May 9, 2014
Chicken Fajita Bombs
I recently made this for a Derby Party and they were a big hit and oh so easy to make. It was also Cinco de Mayo weekend so something called Chicken Fajita Bombs seemed appropriate.

Start with boneless chicken breasts and slice in half lengthwise until you have a two filets about the size of your hand.
For the filling I diced red peppers, jalapenos and sweet onions and used a shredded Monterey Jack cheese.
Add the filling and be very generous as you fill then sprinkle fajita seasoning onto your filling.
Roll up the chicken and wrap with a couple of pieces of bacon. Sprinkle the top with more of the fajita seasoning.
I then smoked at 225 for 2 hours or until the internal temperature was 165. You can either slice into medallions or serve whole as an entrée.
These make great appetizers sliced into medallions and 6 or 8 whole chicken breasts make many, many bite size snacks. I recommend letting the rest prior to slicing as this makes life much easier.
Fajita Seasoning Recipe
1 Tablespoon Cornstarch
2 teaspoons Chili Powder
1 teaspoon Salt
1 teaspoon Paprika
1 teaspoon White Sugar
1/2 teaspoon Onion Powder
1/2 teaspoon Garlic Powder
1/4 teaspoon Cayenne Pepper
1/2 teaspoon Cumin
I actually doubled this and I recommend making a big batch as it will keep forever
Keep Smoking My Friends
Randy
Tuesday, April 22, 2014
Brisket Redux
If you have been following this blog you know all about the challenges I have had with Brisket. The last half dozen have been really good, however last week I changed my formula a bit and believe I have a recipe/formula that will not only please those who get to sample my Brisket, but also one I would not hesitate to use in a contest.
I started with a 15 pound brisket and trimmed the fat an injected and marinated the night before smoking.

For my injection/marinade I used a simple formula
Beef Broth (canned)
A very strong beef broth I created with bouillon cubes making this mix twice the strength
Early the next morning I drained the brisket and put in a new pan. I next coated the brisket with squeeze butter and applied a heavy coat of my Squirrel Rub (more on this later, however it is simply my brisket rub.
Letting the Brisket sit I fired up my pit and let get to 350 before putting on the meat and adding smoke. I used only pecan wood for this cook.
I smoked for 3 hours
I then took the Brisket and wrapped the pan tightly with aluminum foil putting it back on the smoker for 2 hours, again at 350.
After 2 hours I had reached about 185 internal temp and off the pit came the Brisket. I then wrapped the entire pan in an old blanket and let rest for 2 hours at room temperature.
As you may image this really made the house smell great!
After two hours I separated the point and flank draining all the juices into my fat separator and wrapping the flank in foil to put it back on the pit at 350 (I did not all more heat so the heat kept dropping as the meat tenderized) for another two hours.
Meanwhile I cut the point into cubes and placed in a pan along with some sweet and spicy BBQ sauce and some of the juice I had just drained. I also added some of the Squirrel rub and stirred the pan. I then placed the pan back on pit (you can also use an oven if you are home) heating to 300 for another two hours.
That was it and you can tell by the pics it turned out great.


I started with a 15 pound brisket and trimmed the fat an injected and marinated the night before smoking.
For my injection/marinade I used a simple formula
Beef Broth (canned)
A very strong beef broth I created with bouillon cubes making this mix twice the strength
Early the next morning I drained the brisket and put in a new pan. I next coated the brisket with squeeze butter and applied a heavy coat of my Squirrel Rub (more on this later, however it is simply my brisket rub.
Letting the Brisket sit I fired up my pit and let get to 350 before putting on the meat and adding smoke. I used only pecan wood for this cook.
I smoked for 3 hours
I then took the Brisket and wrapped the pan tightly with aluminum foil putting it back on the smoker for 2 hours, again at 350.
After 2 hours I had reached about 185 internal temp and off the pit came the Brisket. I then wrapped the entire pan in an old blanket and let rest for 2 hours at room temperature.
As you may image this really made the house smell great!
After two hours I separated the point and flank draining all the juices into my fat separator and wrapping the flank in foil to put it back on the pit at 350 (I did not all more heat so the heat kept dropping as the meat tenderized) for another two hours.
Meanwhile I cut the point into cubes and placed in a pan along with some sweet and spicy BBQ sauce and some of the juice I had just drained. I also added some of the Squirrel rub and stirred the pan. I then placed the pan back on pit (you can also use an oven if you are home) heating to 300 for another two hours.
That was it and you can tell by the pics it turned out great.
Brisket Point turning to Bunt Ends
Sliced Brisket Flat
Keep Smoking My Friends
Randy
Tuesday, April 8, 2014
Glazed Ham
I have been wanting to try smoking a glazed ham ever since I first read about it on one of the many social media sites I follow. As it worked out it was very easy task and the finished product was fantastic.
I started with a basic spiral bone in ham (not a green ham). I covered the ham with honey Dijon mustard. Next I added a light layer of my pork rub for a second flavor profile and then finally covered this with a third flavor profile of brown sugar then sprayed the entire ham with pineapple juice. I was looking for a good combination of sweet and heat and hoped to keep it moist with the spritzing of pineapple juice.
I heated my Pit to 225 and used apple wood for my smoke. I put the ham in a foil pan (as I do with anything I smoke) and let smoke for 2 hours.
I then removed the ham from the pit, spritzed again with pineapple juice and covered with foil.
I put the ham back on the pit for another hour at 225.
I took the ham off the pit and uncovered adding another layer of brown sugar and spritzing again with pineapple juice.
Back on the pit the ham went uncovered for another hour at 225.
and well perfection is all that comes to mind

The final product had an excellent smoke flavor along with a good combination of sweet and heat. The only think I may do different next time is to not use as much brown sugar on the last coating.
Side of the Week:

To go with my glazed ham I made an Oriental Ramen Broccoli Cole Slaw and here is the recipe.
2 (3 ounce) packages beef-flavor ramen noodles
2 (8 1/2 ounce) packages broccoli coleslaw mix
1 cup toasted slivered almonds
1 cup sunflower seed
1/2 bunch green onion, chopped
1/2 cup sugar
3/4 cup oil
1/3 cup white vinegar
1. Before opening noodles, crush into 1 inch pieces. (This is an important step so crush well) Open packages and set aside flavor packets.
2. Place noodles in bottom of large serving bowl. Top noodles with broccoli slaw, then sprinkle with almonds and sunflower kernels, and green onions.
3. In a separate bowl combine sugar, oil, vinegar, and flavor packets from noodles. Pour over slaw, cover and chill up to 24 hours.
4. Toss before serving.
This makes enough for many, many people so if you have four or less I recommend cutting this recipe in half.
enjoy
Keep Smoking My Friends
Randy
I started with a basic spiral bone in ham (not a green ham). I covered the ham with honey Dijon mustard. Next I added a light layer of my pork rub for a second flavor profile and then finally covered this with a third flavor profile of brown sugar then sprayed the entire ham with pineapple juice. I was looking for a good combination of sweet and heat and hoped to keep it moist with the spritzing of pineapple juice.
I heated my Pit to 225 and used apple wood for my smoke. I put the ham in a foil pan (as I do with anything I smoke) and let smoke for 2 hours.
I then removed the ham from the pit, spritzed again with pineapple juice and covered with foil.
I put the ham back on the pit for another hour at 225.
I took the ham off the pit and uncovered adding another layer of brown sugar and spritzing again with pineapple juice.
Back on the pit the ham went uncovered for another hour at 225.
and well perfection is all that comes to mind
The final product had an excellent smoke flavor along with a good combination of sweet and heat. The only think I may do different next time is to not use as much brown sugar on the last coating.
Side of the Week:
To go with my glazed ham I made an Oriental Ramen Broccoli Cole Slaw and here is the recipe.
2 (3 ounce) packages beef-flavor ramen noodles
2 (8 1/2 ounce) packages broccoli coleslaw mix
1 cup toasted slivered almonds
1 cup sunflower seed
1/2 bunch green onion, chopped
1/2 cup sugar
3/4 cup oil
1/3 cup white vinegar
1. Before opening noodles, crush into 1 inch pieces. (This is an important step so crush well) Open packages and set aside flavor packets.
2. Place noodles in bottom of large serving bowl. Top noodles with broccoli slaw, then sprinkle with almonds and sunflower kernels, and green onions.
3. In a separate bowl combine sugar, oil, vinegar, and flavor packets from noodles. Pour over slaw, cover and chill up to 24 hours.
4. Toss before serving.
This makes enough for many, many people so if you have four or less I recommend cutting this recipe in half.
enjoy
Keep Smoking My Friends
Randy
Wednesday, March 19, 2014
Blackened Chicken
Having just returned from a short vacation where I was able to consume much fresh seafood, much of it blackened, I was not ready to give up on this great taste. Here in Kansas City fresh seafood is not as plentiful, however beef and poultry is.
I decided to try to make my own blackened seasoning and with a little research and effort it was a great success.

Here is the final recipe
1 1/2 Tablespoons Paprika
1 Tablespoon Garlic Powder
1 Tablespoon Onion Powder
1 Tablespoon Ground Dried Thyme
1 teaspoon Black Pepper
1 teaspoon Cayenne Pepper
1 teaspoon Dried Basil
1 teaspoon Dried Oregano
I recommend making a double batch
Mix all ingredients in a bowl and you can save your leftovers indefinitely for future uses.
I had all these ingredients on hand and found this combination to be spot on to the blackened taste I had either had in restaurants or store bought.
Smoke um If You Got um
Randy
I decided to try to make my own blackened seasoning and with a little research and effort it was a great success.
Here is the final recipe
1 1/2 Tablespoons Paprika
1 Tablespoon Garlic Powder
1 Tablespoon Onion Powder
1 Tablespoon Ground Dried Thyme
1 teaspoon Black Pepper
1 teaspoon Cayenne Pepper
1 teaspoon Dried Basil
1 teaspoon Dried Oregano
I recommend making a double batch
Mix all ingredients in a bowl and you can save your leftovers indefinitely for future uses.
I had all these ingredients on hand and found this combination to be spot on to the blackened taste I had either had in restaurants or store bought.
Smoke um If You Got um
Randy
Monday, March 10, 2014
Smoked Pork Chops
With the weather here in K.C. being so great this past weekend I wanted to break out the Pit again and try something different. I decided on smoking Pork Chops.
I had never smoked Pork Chops and was somewhat apprehensive as my past experiences with them was less than satisfying. (shoe leather comes to mind) I did a little research and used some ideas I had for my smoke.
I came up with a new rub recipe (see below) and purchased 4 of the large chops (we from Iowa call Iowa Chops)
I first injected them with apple juice and then applied squeeze butter liberally to the outside and coated with the rub.
I fired the pit to 225 and used pecan wood for my smoke.
Well as you can see below the outcome was great.

I kept my pit temp between 225 - 250 and added smoke for a full two hours. I was looking for an internal temp of about 150. I then took them off the smoker and put on a hot grill to sear the chops and add the nice lines for aesthetic looks. After 6 minutes a side my internal temp was 160 which is where you want to be for your pork. If you do not care about the grill marks you can smoke the chops until they reach 160, however I believe you will find them much better when searing after smoking. Also if you sear them before you smoke you run the risk of not soaking up enough smoke flavor.
In addition to the chops I made some smoked avocado and Bacon Deviled Eggs.

These may have been some the best deviled eggs to date and were very easy.
Start with either smoked eggs (see this blog post for info on smoking eggs) or use hard boiled eggs.
Take out the yolks and put in a mixing bowl.
Combine with about 1 avocado for every 6 eggs
Mix in some mayo and garlic powder to taste.
Mix toughly and put back into your egg whites
Top with bacon bits.
A bonus is that if you have any of your mix left as we did it was great with a slice of cheese on a cracker.
Pork Chop Rub Recipe
6 tablespoons ground cumin
4 tablespoons hot chili powder ( I did not have hot chili powder, just dark chili powder so I added a teaspoon of cayenne pepper) more or less depending on how my heat you seek.
2 tablespoons kosher salt
2 tablespoons ground coriander
1 tablespoon paprika
1 1/2 teaspoons allspice (I left this out as I am not a fan of allspice)
2 teaspoons black pepper
Mix all ingredients in a bowl.
Makes enough for about 12 pork chops or save leftover for later uses
Happy Smoking
Randy
I had never smoked Pork Chops and was somewhat apprehensive as my past experiences with them was less than satisfying. (shoe leather comes to mind) I did a little research and used some ideas I had for my smoke.
I came up with a new rub recipe (see below) and purchased 4 of the large chops (we from Iowa call Iowa Chops)
I first injected them with apple juice and then applied squeeze butter liberally to the outside and coated with the rub.
I fired the pit to 225 and used pecan wood for my smoke.
Well as you can see below the outcome was great.
I kept my pit temp between 225 - 250 and added smoke for a full two hours. I was looking for an internal temp of about 150. I then took them off the smoker and put on a hot grill to sear the chops and add the nice lines for aesthetic looks. After 6 minutes a side my internal temp was 160 which is where you want to be for your pork. If you do not care about the grill marks you can smoke the chops until they reach 160, however I believe you will find them much better when searing after smoking. Also if you sear them before you smoke you run the risk of not soaking up enough smoke flavor.
Smoked Avocado and Bacon Deviled Eggs
In addition to the chops I made some smoked avocado and Bacon Deviled Eggs.
These may have been some the best deviled eggs to date and were very easy.
Start with either smoked eggs (see this blog post for info on smoking eggs) or use hard boiled eggs.
Take out the yolks and put in a mixing bowl.
Combine with about 1 avocado for every 6 eggs
Mix in some mayo and garlic powder to taste.
Mix toughly and put back into your egg whites
Top with bacon bits.
A bonus is that if you have any of your mix left as we did it was great with a slice of cheese on a cracker.
Pork Chop Rub Recipe
6 tablespoons ground cumin
4 tablespoons hot chili powder ( I did not have hot chili powder, just dark chili powder so I added a teaspoon of cayenne pepper) more or less depending on how my heat you seek.
2 tablespoons kosher salt
2 tablespoons ground coriander
1 tablespoon paprika
1 1/2 teaspoons allspice (I left this out as I am not a fan of allspice)
2 teaspoons black pepper
Mix all ingredients in a bowl.
Makes enough for about 12 pork chops or save leftover for later uses
Happy Smoking
Randy
Friday, February 21, 2014
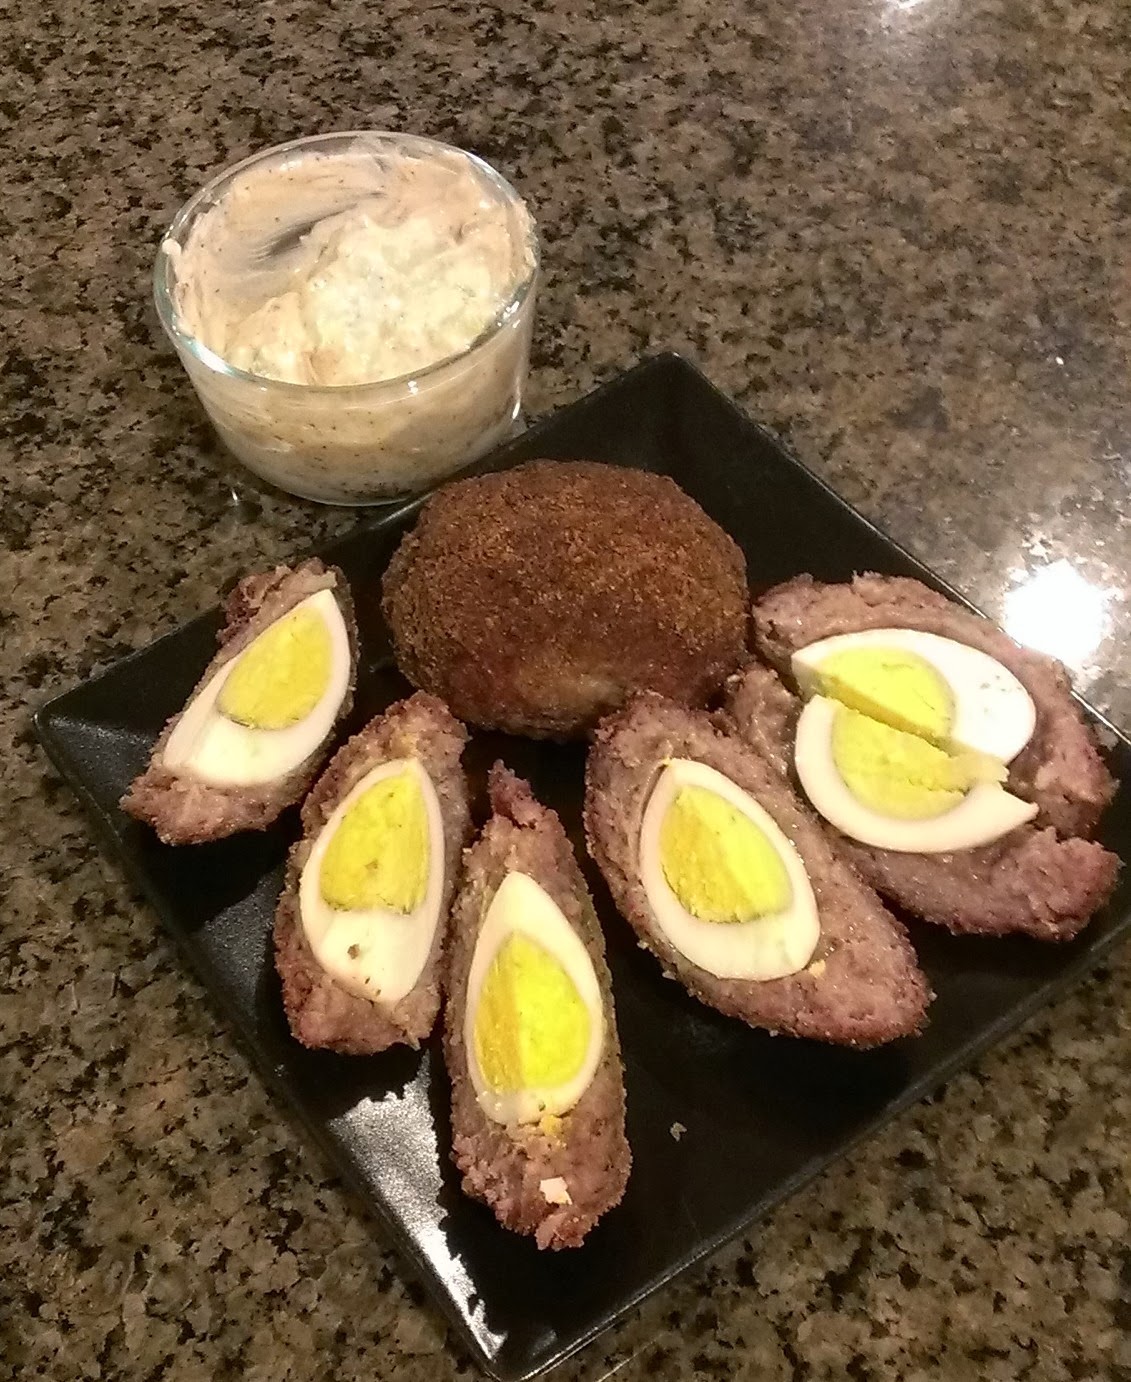
SMOKED SCOTCH EGGS
A few weeks back here @mysideofthesmoker I was looking for something new to smoke. I remember a couple of years back at the Ren Fair I had a Scotch Egg so I said, hey I will give that a try. Here is the result
With Patti's being my prep chef for this day here is the process
When ready to cook, start the your smoker and get to a temp of 250
Then until the fire is established (4 to 5 minutes add your wood chips. I used Pecan
Arrange the eggs in an aluminum pan and smoke for about two hours
I then finished in the oven setting the heat to 375 degrees. and cooked for about 30 minutes more
Let cool then slice each egg into quarters with a sharp knife.
The Sauce
Combine the mayonnaise, mustard, and remaining 2 of my all purpose rub in a small mixing bowl.
Garnish with Pickles
They are great for a happy hour as one egg is a lot!
Randy
With Patti's being my prep chef for this day here is the process
Ingredients
- 1/2 cup all-purpose flour
- 4 teaspoons of my favorite All Purpose Rub
- 4 hard-cooked eggs, peeled
- 1 pound seasoned sausage, such as Jimmy Dean or Bob Evans
- 1 raw egg, beaten, in a shallow dish
- 1 cup dry bread crumbs, plus more if needed, in a shallow dish
- 1 cup mayonnaise
- 1/4 cup Dijon-style mustard
Preparation
Combine the flour and 2 teaspoons of the Traeger Pork and Poultry Rub in a small shallow dish. Wet the eggs with water and roll in the seasoned flour to lightly coat. Wet your hands and divide the sausage into 4 equal-size balls. Flatten each ball into an oval. Cover each egg in sausage, smoothing the seams to encase the egg evenly. Rewet your hands as necessary. Dip each sausage-covered egg in the beaten egg, letting any excess drain off, and then dredge in the bread crumbs. Refrigerate the eggs, uncovered, for 1 to 2 hours.When ready to cook, start the your smoker and get to a temp of 250
Then until the fire is established (4 to 5 minutes add your wood chips. I used Pecan
Arrange the eggs in an aluminum pan and smoke for about two hours
I then finished in the oven setting the heat to 375 degrees. and cooked for about 30 minutes more
Let cool then slice each egg into quarters with a sharp knife.
The Sauce
Combine the mayonnaise, mustard, and remaining 2 of my all purpose rub in a small mixing bowl.
Garnish with Pickles
They are great for a happy hour as one egg is a lot!
Randy
Saturday, February 8, 2014
The Professor's Slaw
As I have been asked for this recipe each and every time I serve it here it is!
The Professor's Slaw Recipe

Ingredients:
1/2 cup mayonnaise
1/3 cup sugar
1/4 cup milk
1/4 cup buttermilk
2 1/2 tablespoons lemon juice
1 1/2 tablespoons white vinegar
1/2 teaspoon salt
1/8 teaspoon pepper
8 cups finely chopped cabbage (approx. 1 head)
1/4 cup shredded carrot (1 medium carrot)
2 tablespoons minced onion
Directions:
* Be sure cabbage and carrots are chopped into very fine pieces (a little bigger than rice)
* Combine the mayonnaise, sugar, milk, buttermilk, lemon juice, vinegar, salt and pepper in large bowl. Beat until smooth
* Add cabbage, carrots, and onions. Mix well.
* Cover and refrigerate for at least 2 hours, if you let it sit over night it's even better
* I like to use a head of both red and yellow cabbage and if you do double the rest of the ingredients and add a small amount at a time until you get the consistency you seek
The Professor's Slaw Recipe
Ingredients:
1/2 cup mayonnaise
1/3 cup sugar
1/4 cup milk
1/4 cup buttermilk
2 1/2 tablespoons lemon juice
1 1/2 tablespoons white vinegar
1/2 teaspoon salt
1/8 teaspoon pepper
8 cups finely chopped cabbage (approx. 1 head)
1/4 cup shredded carrot (1 medium carrot)
2 tablespoons minced onion
Directions:
* Be sure cabbage and carrots are chopped into very fine pieces (a little bigger than rice)
* Combine the mayonnaise, sugar, milk, buttermilk, lemon juice, vinegar, salt and pepper in large bowl. Beat until smooth
* Add cabbage, carrots, and onions. Mix well.
* Cover and refrigerate for at least 2 hours, if you let it sit over night it's even better
* I like to use a head of both red and yellow cabbage and if you do double the rest of the ingredients and add a small amount at a time until you get the consistency you seek
Tuesday, January 28, 2014
Smoked Pepper Jack Bologna

Start with a few nice size logs of bologna which you should be able to get at your local market or butcher shop.
Some Pepper Jack Cheese (I used the generic brand of pepper cheese from the super market)
Take the end off a turkey baster and put at least one core through the center of the bologna log.

Notice: I left the casing on for this step as it makes it much easier.
I also recommend for spicier bologna to make several cores in order to add more cheese
Save the stick you remove from the coring to use a plugs.
Cube some cheese about the same diameter as your core and stuff into the bologna log.

Place the plugs you saved from the previous step in both ends of your core.

Save the rest of the piece you removed from the core and either smoke, grill or fry up quick for a snack while you smoke the bologna logs The make an excellent snack.
Smoke for an hour and a half at 250 then glaze with a hickory sauce*
Take off the smoker and let rest for ten minutes then slice for sandwiches topping with hot mustard and or hot sauce and some sweet onion. I also like to cut into small chunks and server for an appetizer with my smoked cheese.
Sauce recipe I used:
2 tablespoons onion powder
2 tablespoons garlic powder
2 cups ketchup
2 tablespoons smoked sweet smoked paprika (must be sweet smoked)
2/3 cup cider vinegar
2 tablespoons Worcestershire sauce
1/4 cup dark brown sugar
2 tablespoons honey
2 tablespoons maple syrup
2 tablespoons kosher salt
2 tablespoons black pepper
combine in a pot and let simmer all day then let cool for serving (you can also blend all ingredients in a blender first to cut simmer time)
Yes my bologna has a first name and it is awesome!
Happy Smoking
Randy
Monday, January 6, 2014
Smoking Cheese
Yes you read that right, I just smoked my first cheese on my Pit. I had bee reading about it for awhile and decided to give it a shot.
You can smoke almost any type of cheese so I choose three of my favorites, Gouda, Cheddar and Provolone
The term used when smoking cheese is "Cold Smoking" as you have to keep your pit temp under 90 or your cheese will start to melt.
I simply cut my cheeses in to a few smaller parts as I wanted to use a general purpose rub on a couple of the chunks just for fun.
I let my cheese warm up at room temp for about an hour in order to induce more smoke into the cheese during the process. I put in about half a chimney of charcoal and then put in a large chuck of soaked wood.
I was able to control the temp of my smoke fairly easily with the damper between the firebox and smoker box, however the temp was a cold 29 out so that made this part easier. I would image smoking cheese would be very difficult in warmer weather.
I smoked for about 2 hours and 15 minutes, but I would not hesitate to go longer (up to 3 hours)
Here is the finished product

The Cheese turned out great!
Smoking Eggs
As you can see in the picture above I also like smoking eggs. This process is also very easy and I put the eggs on my pit at the same time the cheese was finishing up.
I get the Pit up to about 250 degrees lay the eggs (pun intended) on the grate and use lots of smoke for about 2 hours..
Here are the finished eggs

These beauties are awesome in Egg Salad and my Smoked Deviled Eggs (see previous post)
Cheers
Randy
You can smoke almost any type of cheese so I choose three of my favorites, Gouda, Cheddar and Provolone
The term used when smoking cheese is "Cold Smoking" as you have to keep your pit temp under 90 or your cheese will start to melt.
I simply cut my cheeses in to a few smaller parts as I wanted to use a general purpose rub on a couple of the chunks just for fun.
I let my cheese warm up at room temp for about an hour in order to induce more smoke into the cheese during the process. I put in about half a chimney of charcoal and then put in a large chuck of soaked wood.
I was able to control the temp of my smoke fairly easily with the damper between the firebox and smoker box, however the temp was a cold 29 out so that made this part easier. I would image smoking cheese would be very difficult in warmer weather.
I smoked for about 2 hours and 15 minutes, but I would not hesitate to go longer (up to 3 hours)
Here is the finished product
The Cheese turned out great!
Smoking Eggs
As you can see in the picture above I also like smoking eggs. This process is also very easy and I put the eggs on my pit at the same time the cheese was finishing up.
I get the Pit up to about 250 degrees lay the eggs (pun intended) on the grate and use lots of smoke for about 2 hours..
Here are the finished eggs
These beauties are awesome in Egg Salad and my Smoked Deviled Eggs (see previous post)
Cheers
Randy
Subscribe to:
Posts (Atom)