Yes I realize that this is the saying of Sweet Baby Ray's BBQ Sauce, however I have found this to be an absolute truth when BBQing.
While I make my own sauce I really enjoy two commercial brands. The previously mentioned Sweet Baby Ray's.
and another sauce I have just recently discovered through a friend, D.R. Full Moon, a Kansas City BBQ Sauce.
I don't know a lot about the Full Moon sauce except it is really good when using as your BBQ Glaze. I enjoy Sweet Baby Ray's as a general purpose sauce, meaning on eggs, hamburgers etc.
Now most of you who follow this blog know I have a great sauce for glazing as well. (see below)
Now the key I have found when applying sauce is to apply when you are hot and then let the meat cool while the glaze settles in. I sometimes do this by firing up a BBQ Grill as I finish up on the pit and then when the grill is its hottest more the meat over and glaze with sauce while turning the grill off and keeping it closed.
Keep Smoking My Friends
Randy
Randy's BBQ Sauce
Ingredients
1 1/4 cups ketchup, preferably organic
1 cup dark brown sugar
1/4 cup molasses
1/4 cup pineapple juice (or you can sub apple cider vinegar)
1/4 cup water
1 tablespoon worchestire sauce
2 1/2 teaspoons ground mustard
2 teaspoons smoked paprika
1/2 teaspoon garlic powder
1/4-1/2 teaspoon cayenne pepper (use less if you don't like the heat)
1 1/2 teaspoons kosher salt
1 teaspoon pepper
1/8 cold water mixed with 1 tablespoon corn starch (optional)
Combine all the ingredients except the water and corn starch mixture in a medium size sauce pot. Bring to a boil and reduce and simmer for five minutes or until all the sugar has dissolved. If you like a thicker BBQ Sauce add the water and corn starch mixture. Simmer until desired thickness is reached, but watch closely. It thickens really fast! Serve immediately or store in fridge.
Tuesday, October 7, 2014
Tuesday, September 9, 2014
Bacon Wrapped...
I was having a group of Usual Suspects over for the labor day weekend and wanted to make some great smoked appetizers. I choose Smoked Bologna, which I had smoked previously, and two new items.
Stuffed Jalapeno Peppers Wrapped in Bacon and Tater Tots, both plain and some stuffed with cheese and wrapped in Bacon.
Stuffed Jalapeno Peppers
I started with some larger peppers hoping they would not be as hot and cored them removing the white and seeds. I then stuffed them with my smoked meatloaf (previously prepared and smoked) and wrapped with with a whole piece of bacon. I then placed each in an aluminum pan for smoking.
I had them on the pit for about two hours at 225 - 250 adding smoke the entire time. I also sprinkled some of my basic BBQ Rub on top. I then sliced them into pit sized pieces after allowing to cool for 20 minutes.The real key to being done is when the bacon is nice and crisp.
They turned out really good, however they were HOT! I really could not eat them, however those Usual Suspects who were fire eaters really ate them up.
Bacon Wrapped Tater Tots.
For the Tater Tots I tried making small incisions in each tot and putting a small piece of cheese inside, however this was very time consuming and I really could not get enough cheese into each tot to make a difference. The next time I will put a larger chuck of cheese on the tot and then warp in Bacon. I used about a third of a piece of bacon on each tot and sprinkled basic rub on top. (again using an aluminum pan) I smoked at 225 - 250 for two hours adding smoke the entire time. Again the key to the readiness of the tots is crisp bacon.
Even with the cheese a non factor these turned out awesome! Word to the wise if doing these make about three times as many as you need as I ate six before anyone arrived ;)
The plain tots were also great and I sprayed the aluminum tins with cooking spray prior to smoking. I used the same formula, sprinkling my basic rub on top and smoking at 225 - 250 for about two hours. I added smoke the entire time and when the tots were crisp you know they are done.
Keep Smoking My Friends
Randy
Stuffed Jalapeno Peppers Wrapped in Bacon and Tater Tots, both plain and some stuffed with cheese and wrapped in Bacon.
Stuffed Jalapeno Peppers
I started with some larger peppers hoping they would not be as hot and cored them removing the white and seeds. I then stuffed them with my smoked meatloaf (previously prepared and smoked) and wrapped with with a whole piece of bacon. I then placed each in an aluminum pan for smoking.
I had them on the pit for about two hours at 225 - 250 adding smoke the entire time. I also sprinkled some of my basic BBQ Rub on top. I then sliced them into pit sized pieces after allowing to cool for 20 minutes.The real key to being done is when the bacon is nice and crisp.
They turned out really good, however they were HOT! I really could not eat them, however those Usual Suspects who were fire eaters really ate them up.
Bacon Wrapped Tater Tots.
For the Tater Tots I tried making small incisions in each tot and putting a small piece of cheese inside, however this was very time consuming and I really could not get enough cheese into each tot to make a difference. The next time I will put a larger chuck of cheese on the tot and then warp in Bacon. I used about a third of a piece of bacon on each tot and sprinkled basic rub on top. (again using an aluminum pan) I smoked at 225 - 250 for two hours adding smoke the entire time. Again the key to the readiness of the tots is crisp bacon.
Even with the cheese a non factor these turned out awesome! Word to the wise if doing these make about three times as many as you need as I ate six before anyone arrived ;)
The plain tots were also great and I sprayed the aluminum tins with cooking spray prior to smoking. I used the same formula, sprinkling my basic rub on top and smoking at 225 - 250 for about two hours. I added smoke the entire time and when the tots were crisp you know they are done.
Keep Smoking My Friends
Randy
Wednesday, August 20, 2014
Smoked Turkey Breasts
While I had smoked whole turkeys before I was wanting some sliced smoked turkey for sandwiches so I stopped at one of my local markets and picked up two bone in 15 pound turkey breasts to smoke.
I started by injecting with a mixture of apple juice and my Cluck-Cluck Rub and let set for a couple of hours. Some rave about using a brine, but I have yet to try this as my luck with injecting has been great.
I then rubbed the birds with yellow mustard and more of the Cluck-Cluck Rub and then added a half stick of butter and more rub in each cavity. This is an essential step in my opinion to keep the turkey moist. (true also with a whole turkey) You can also add some sliced apple and onion if you wish as this also helps with moisture.
I heated up my pit to 250 - 275 and used hickory and cherry wood for the smoke. I cooked uncovered for an hour and covered. As I have said in other articles when smoking poultry it is very easy to over smoke causing a bitter taste in your bird.
I cooked for two hours more and the finished product as you can see turned out great. I rested the birds for about 30 minutes before slicing.
In the picture the skin looks a little dark, however it was crisp and you could easily bit through it. This is key to smoking any poultry as you get a lot of taste in the skin!
The turkey sliced very nice and made great wraps!
Keep Smoking My Friends
Randy
I started by injecting with a mixture of apple juice and my Cluck-Cluck Rub and let set for a couple of hours. Some rave about using a brine, but I have yet to try this as my luck with injecting has been great.
I then rubbed the birds with yellow mustard and more of the Cluck-Cluck Rub and then added a half stick of butter and more rub in each cavity. This is an essential step in my opinion to keep the turkey moist. (true also with a whole turkey) You can also add some sliced apple and onion if you wish as this also helps with moisture.
I heated up my pit to 250 - 275 and used hickory and cherry wood for the smoke. I cooked uncovered for an hour and covered. As I have said in other articles when smoking poultry it is very easy to over smoke causing a bitter taste in your bird.
I cooked for two hours more and the finished product as you can see turned out great. I rested the birds for about 30 minutes before slicing.
In the picture the skin looks a little dark, however it was crisp and you could easily bit through it. This is key to smoking any poultry as you get a lot of taste in the skin!
The turkey sliced very nice and made great wraps!
Keep Smoking My Friends
Randy
Saturday, July 26, 2014
Smoking, This and That
For those who have been fortunate to either be following this blog or physically following me you know that the last month has been a whirl wind of smoke! I have had the pit fired no less that 7 times with cooks of Ribs twice, 3 separate brisket cooks, 5 pork shoulders, several meatloafs, salmon, sausage jalapeno bombs and the beat goes on.
So for the last few weeks I have been smoking several different types of items and making some other dishes off the pit as well as experimenting with new side dishes.
For this weeks blog I wanted to touch on a few new items.
First I was looking for a new snack to serve to some of the usual suspects. I really enjoy smoked cheese and crackers, however the temps have been just to hot to smoke cheese So I decided on smoking the crackers.
As you can see in the pic I choose Ritz Crackers (after all would Andy lie? Everything taste better on a Ritz!)
I simply added the chosen amount of crackers to a pan, fired my Pit trying to keep the temp below 200 and poured as much smoke as possible into the crackers for 1 1/2 to 2 hours.
The outcome was fantastic! Went well with all types of cheese and made for a great happy hours.
Side of the Week:
I am always looking for new side dishes and lately I have been in an I...Talian mood.
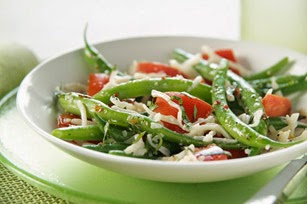
I choose summer salad of Green Bean and Mozzarella Cheese. The most important point and I can not stress this enough is to use all FRESH ingredients.
Ingredients:
2 Cups Fresh Green Beans cooked and drained
6 (I used about twice that many) Plum or Cherry Tomatoes Halved
1 Cup Fresh Mozzarella Cheese Grated
1/3 Cup Fresh Basil (I used about 6 leaves)
1/3 Cup Italian Dressing of your choice
Toss all ingredients in a bowl and refrigerate for at least an hour.
Keep Smoking My Friends
Randy
So for the last few weeks I have been smoking several different types of items and making some other dishes off the pit as well as experimenting with new side dishes.
For this weeks blog I wanted to touch on a few new items.
First I was looking for a new snack to serve to some of the usual suspects. I really enjoy smoked cheese and crackers, however the temps have been just to hot to smoke cheese So I decided on smoking the crackers.
As you can see in the pic I choose Ritz Crackers (after all would Andy lie? Everything taste better on a Ritz!)
I simply added the chosen amount of crackers to a pan, fired my Pit trying to keep the temp below 200 and poured as much smoke as possible into the crackers for 1 1/2 to 2 hours.
The outcome was fantastic! Went well with all types of cheese and made for a great happy hours.
Side of the Week:
I am always looking for new side dishes and lately I have been in an I...Talian mood.
I choose summer salad of Green Bean and Mozzarella Cheese. The most important point and I can not stress this enough is to use all FRESH ingredients.
Ingredients:
2 Cups Fresh Green Beans cooked and drained
6 (I used about twice that many) Plum or Cherry Tomatoes Halved
1 Cup Fresh Mozzarella Cheese Grated
1/3 Cup Fresh Basil (I used about 6 leaves)
1/3 Cup Italian Dressing of your choice
Toss all ingredients in a bowl and refrigerate for at least an hour.
Keep Smoking My Friends
Randy
Thursday, July 10, 2014
Our First Event
One of my first goals when diving into the world of BBQ was to compete in BBQ contests. However, as I have been smoking for a couple of years now I have now found real enjoyment out of cooking for others just to see the enjoyment they get out of eating all the different items that come off the Pit.
With this in mind I accepted my first offer to cater an event. After some vigorous negotiations I was hired to do a wedding rehearsal dinner. The guest list looked to be 55-60 so with that in mind I I started planning months in advance.
A couple of challenges arose early on. First I had no experience in cooking for that number of people and had no idea how much food I would need. Second, I had to decided on a menu not only for the numbers, but one I could prepare. Last I would need to travel to get to the event site and needed to be able to haul the necessary equipment without the need of a trailer.
I started doing some research and found that if you were serving sandwiches you could calculate about a 1/2 pound of meat per person. That made it sense and also led to my option of smoking brisket and pork shoulder as these make excellent sandwiches and can be prepared to feed a larget number.
I figured about 30 lbs of brisket and 36 lbs of pork shoulder would be more than enough. That came out to two briskets and 4 pork shoulders.
I smoked the briskets a day in advance of my departure and would smoke the pork on site. Yes you are correct that heating the brisket on site and making it moist would prove a challenge. (more on that later)
I arrived on site and set up camp.
As you can see in this picture I found an extra smoker on site (also more on this later)
I started on the day of the event at 6:00 in the morning by injecting the pork shoulders and reading my smokers. At 8:00 I fired the Pits and rubbed the meat. The smoke arrived about 8:30 which is when I put on the meat.
I was smoking around 250 - 275 and was looking to add smoke for about the first three hours. I has smoked the baked beans the day and had coleslaw to make so that would keep both Central Patti and I busy for a few hours.
I covered the port shoulders after the smoke was done and went about getting other things done. I glazed the pork about an hour prior to the start of the event and put the beans in the oven for warming and thickening.
Now as for the brisket I laid it out in a warming pan and with a combination of my Magic Mix and Beef Broth attempted to make sure the beef slices were moist, but not soggy. This turned out only marginal to me, however the brisket went very fast once the guest started eating.
I thought the overall cook was average, however I had lots of positive comments, met a lot of great people and made some new friends. I also learned a lot about catering an event and hope to do another soon.
Keep Smoking My Friends
Randy
With this in mind I accepted my first offer to cater an event. After some vigorous negotiations I was hired to do a wedding rehearsal dinner. The guest list looked to be 55-60 so with that in mind I I started planning months in advance.
A couple of challenges arose early on. First I had no experience in cooking for that number of people and had no idea how much food I would need. Second, I had to decided on a menu not only for the numbers, but one I could prepare. Last I would need to travel to get to the event site and needed to be able to haul the necessary equipment without the need of a trailer.
I started doing some research and found that if you were serving sandwiches you could calculate about a 1/2 pound of meat per person. That made it sense and also led to my option of smoking brisket and pork shoulder as these make excellent sandwiches and can be prepared to feed a larget number.
I figured about 30 lbs of brisket and 36 lbs of pork shoulder would be more than enough. That came out to two briskets and 4 pork shoulders.
I smoked the briskets a day in advance of my departure and would smoke the pork on site. Yes you are correct that heating the brisket on site and making it moist would prove a challenge. (more on that later)
I arrived on site and set up camp.
As you can see in this picture I found an extra smoker on site (also more on this later)
I started on the day of the event at 6:00 in the morning by injecting the pork shoulders and reading my smokers. At 8:00 I fired the Pits and rubbed the meat. The smoke arrived about 8:30 which is when I put on the meat.
I was smoking around 250 - 275 and was looking to add smoke for about the first three hours. I has smoked the baked beans the day and had coleslaw to make so that would keep both Central Patti and I busy for a few hours.
I covered the port shoulders after the smoke was done and went about getting other things done. I glazed the pork about an hour prior to the start of the event and put the beans in the oven for warming and thickening.
Now as for the brisket I laid it out in a warming pan and with a combination of my Magic Mix and Beef Broth attempted to make sure the beef slices were moist, but not soggy. This turned out only marginal to me, however the brisket went very fast once the guest started eating.
I thought the overall cook was average, however I had lots of positive comments, met a lot of great people and made some new friends. I also learned a lot about catering an event and hope to do another soon.
Keep Smoking My Friends
Randy
Friday, June 20, 2014
Bacon Wrapped, Mozzarella, Pineapple, Onion Rings
Yes that is not only a mouth full to say, but also to eat.
However, if you take the time to prepare and cook them you will not be disappointed.
Now I am not going to try and take credit for inventing them, only perfecting them ;)
Here is where I learned how.
Harry Soo is one of the top 10 BB Pit Masters in the world and has dozens of great ideas on his pages.
To things I learned is that wrapping the rings takes a lot of patience (thanks Central Patti) and I cooked over direct heat adding a light smoke to my pit. Then moved to indirect heat after the bacon looked crispy to finish them off.
Keep Smoking My Friends
Randy
Randy
Friday, May 9, 2014
Chicken Fajita Bombs
I recently made this for a Derby Party and they were a big hit and oh so easy to make. It was also Cinco de Mayo weekend so something called Chicken Fajita Bombs seemed appropriate.
Start with boneless chicken breasts and slice in half lengthwise until you have a two filets about the size of your hand.
For the filling I diced red peppers, jalapenos and sweet onions and used a shredded Monterey Jack cheese.
Add the filling and be very generous as you fill then sprinkle fajita seasoning onto your filling.
Roll up the chicken and wrap with a couple of pieces of bacon. Sprinkle the top with more of the fajita seasoning.
I then smoked at 225 for 2 hours or until the internal temperature was 165. You can either slice into medallions or serve whole as an entrée.
These make great appetizers sliced into medallions and 6 or 8 whole chicken breasts make many, many bite size snacks. I recommend letting the rest prior to slicing as this makes life much easier.
Fajita Seasoning Recipe
1 Tablespoon Cornstarch
2 teaspoons Chili Powder
1 teaspoon Salt
1 teaspoon Paprika
1 teaspoon White Sugar
1/2 teaspoon Onion Powder
1/2 teaspoon Garlic Powder
1/4 teaspoon Cayenne Pepper
1/2 teaspoon Cumin
I actually doubled this and I recommend making a big batch as it will keep forever
Keep Smoking My Friends
Randy
Start with boneless chicken breasts and slice in half lengthwise until you have a two filets about the size of your hand.
For the filling I diced red peppers, jalapenos and sweet onions and used a shredded Monterey Jack cheese.
Add the filling and be very generous as you fill then sprinkle fajita seasoning onto your filling.
Roll up the chicken and wrap with a couple of pieces of bacon. Sprinkle the top with more of the fajita seasoning.
I then smoked at 225 for 2 hours or until the internal temperature was 165. You can either slice into medallions or serve whole as an entrée.
These make great appetizers sliced into medallions and 6 or 8 whole chicken breasts make many, many bite size snacks. I recommend letting the rest prior to slicing as this makes life much easier.
Fajita Seasoning Recipe
1 Tablespoon Cornstarch
2 teaspoons Chili Powder
1 teaspoon Salt
1 teaspoon Paprika
1 teaspoon White Sugar
1/2 teaspoon Onion Powder
1/2 teaspoon Garlic Powder
1/4 teaspoon Cayenne Pepper
1/2 teaspoon Cumin
I actually doubled this and I recommend making a big batch as it will keep forever
Keep Smoking My Friends
Randy
Subscribe to:
Posts (Atom)