Having just returned from a short vacation where I was able to consume much fresh seafood, much of it blackened, I was not ready to give up on this great taste. Here in Kansas City fresh seafood is not as plentiful, however beef and poultry is.
I decided to try to make my own blackened seasoning and with a little research and effort it was a great success.
Here is the final recipe
1 1/2 Tablespoons Paprika
1 Tablespoon Garlic Powder
1 Tablespoon Onion Powder
1 Tablespoon Ground Dried Thyme
1 teaspoon Black Pepper
1 teaspoon Cayenne Pepper
1 teaspoon Dried Basil
1 teaspoon Dried Oregano
I recommend making a double batch
Mix all ingredients in a bowl and you can save your leftovers indefinitely for future uses.
I had all these ingredients on hand and found this combination to be spot on to the blackened taste I had either had in restaurants or store bought.
Smoke um If You Got um
Randy
Wednesday, March 19, 2014
Monday, March 10, 2014
Smoked Pork Chops
With the weather here in K.C. being so great this past weekend I wanted to break out the Pit again and try something different. I decided on smoking Pork Chops.
I had never smoked Pork Chops and was somewhat apprehensive as my past experiences with them was less than satisfying. (shoe leather comes to mind) I did a little research and used some ideas I had for my smoke.
I came up with a new rub recipe (see below) and purchased 4 of the large chops (we from Iowa call Iowa Chops)
I first injected them with apple juice and then applied squeeze butter liberally to the outside and coated with the rub.
I fired the pit to 225 and used pecan wood for my smoke.
Well as you can see below the outcome was great.
I kept my pit temp between 225 - 250 and added smoke for a full two hours. I was looking for an internal temp of about 150. I then took them off the smoker and put on a hot grill to sear the chops and add the nice lines for aesthetic looks. After 6 minutes a side my internal temp was 160 which is where you want to be for your pork. If you do not care about the grill marks you can smoke the chops until they reach 160, however I believe you will find them much better when searing after smoking. Also if you sear them before you smoke you run the risk of not soaking up enough smoke flavor.
In addition to the chops I made some smoked avocado and Bacon Deviled Eggs.
These may have been some the best deviled eggs to date and were very easy.
Start with either smoked eggs (see this blog post for info on smoking eggs) or use hard boiled eggs.
Take out the yolks and put in a mixing bowl.
Combine with about 1 avocado for every 6 eggs
Mix in some mayo and garlic powder to taste.
Mix toughly and put back into your egg whites
Top with bacon bits.
A bonus is that if you have any of your mix left as we did it was great with a slice of cheese on a cracker.
Pork Chop Rub Recipe
6 tablespoons ground cumin
4 tablespoons hot chili powder ( I did not have hot chili powder, just dark chili powder so I added a teaspoon of cayenne pepper) more or less depending on how my heat you seek.
2 tablespoons kosher salt
2 tablespoons ground coriander
1 tablespoon paprika
1 1/2 teaspoons allspice (I left this out as I am not a fan of allspice)
2 teaspoons black pepper
Mix all ingredients in a bowl.
Makes enough for about 12 pork chops or save leftover for later uses
Happy Smoking
Randy
I had never smoked Pork Chops and was somewhat apprehensive as my past experiences with them was less than satisfying. (shoe leather comes to mind) I did a little research and used some ideas I had for my smoke.
I came up with a new rub recipe (see below) and purchased 4 of the large chops (we from Iowa call Iowa Chops)
I first injected them with apple juice and then applied squeeze butter liberally to the outside and coated with the rub.
I fired the pit to 225 and used pecan wood for my smoke.
Well as you can see below the outcome was great.
I kept my pit temp between 225 - 250 and added smoke for a full two hours. I was looking for an internal temp of about 150. I then took them off the smoker and put on a hot grill to sear the chops and add the nice lines for aesthetic looks. After 6 minutes a side my internal temp was 160 which is where you want to be for your pork. If you do not care about the grill marks you can smoke the chops until they reach 160, however I believe you will find them much better when searing after smoking. Also if you sear them before you smoke you run the risk of not soaking up enough smoke flavor.
Smoked Avocado and Bacon Deviled Eggs
In addition to the chops I made some smoked avocado and Bacon Deviled Eggs.
These may have been some the best deviled eggs to date and were very easy.
Start with either smoked eggs (see this blog post for info on smoking eggs) or use hard boiled eggs.
Take out the yolks and put in a mixing bowl.
Combine with about 1 avocado for every 6 eggs
Mix in some mayo and garlic powder to taste.
Mix toughly and put back into your egg whites
Top with bacon bits.
A bonus is that if you have any of your mix left as we did it was great with a slice of cheese on a cracker.
Pork Chop Rub Recipe
6 tablespoons ground cumin
4 tablespoons hot chili powder ( I did not have hot chili powder, just dark chili powder so I added a teaspoon of cayenne pepper) more or less depending on how my heat you seek.
2 tablespoons kosher salt
2 tablespoons ground coriander
1 tablespoon paprika
1 1/2 teaspoons allspice (I left this out as I am not a fan of allspice)
2 teaspoons black pepper
Mix all ingredients in a bowl.
Makes enough for about 12 pork chops or save leftover for later uses
Happy Smoking
Randy
Friday, February 21, 2014
SMOKED SCOTCH EGGS
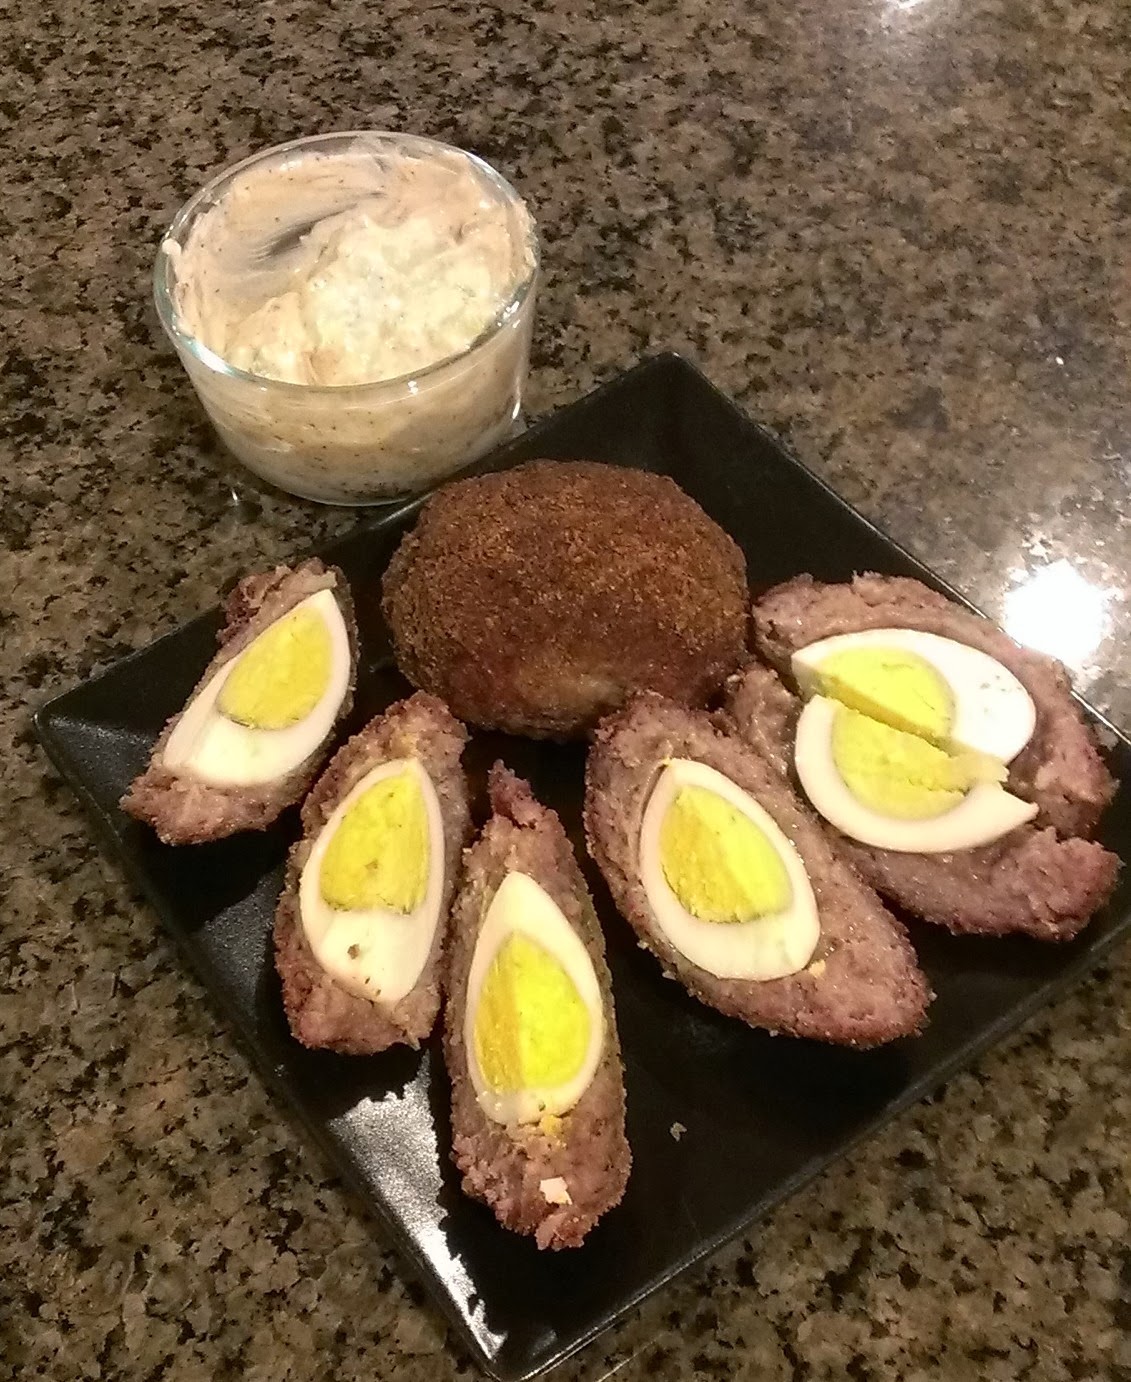
A few weeks back here @mysideofthesmoker I was looking for something new to smoke. I remember a couple of years back at the Ren Fair I had a Scotch Egg so I said, hey I will give that a try. Here is the result
With Patti's being my prep chef for this day here is the process
When ready to cook, start the your smoker and get to a temp of 250
Then until the fire is established (4 to 5 minutes add your wood chips. I used Pecan
Arrange the eggs in an aluminum pan and smoke for about two hours
I then finished in the oven setting the heat to 375 degrees. and cooked for about 30 minutes more
Let cool then slice each egg into quarters with a sharp knife.
The Sauce
Combine the mayonnaise, mustard, and remaining 2 of my all purpose rub in a small mixing bowl.
Garnish with Pickles
They are great for a happy hour as one egg is a lot!
Randy
With Patti's being my prep chef for this day here is the process
Ingredients
- 1/2 cup all-purpose flour
- 4 teaspoons of my favorite All Purpose Rub
- 4 hard-cooked eggs, peeled
- 1 pound seasoned sausage, such as Jimmy Dean or Bob Evans
- 1 raw egg, beaten, in a shallow dish
- 1 cup dry bread crumbs, plus more if needed, in a shallow dish
- 1 cup mayonnaise
- 1/4 cup Dijon-style mustard
Preparation
Combine the flour and 2 teaspoons of the Traeger Pork and Poultry Rub in a small shallow dish. Wet the eggs with water and roll in the seasoned flour to lightly coat. Wet your hands and divide the sausage into 4 equal-size balls. Flatten each ball into an oval. Cover each egg in sausage, smoothing the seams to encase the egg evenly. Rewet your hands as necessary. Dip each sausage-covered egg in the beaten egg, letting any excess drain off, and then dredge in the bread crumbs. Refrigerate the eggs, uncovered, for 1 to 2 hours.When ready to cook, start the your smoker and get to a temp of 250
Then until the fire is established (4 to 5 minutes add your wood chips. I used Pecan
Arrange the eggs in an aluminum pan and smoke for about two hours
I then finished in the oven setting the heat to 375 degrees. and cooked for about 30 minutes more
Let cool then slice each egg into quarters with a sharp knife.
The Sauce
Combine the mayonnaise, mustard, and remaining 2 of my all purpose rub in a small mixing bowl.
Garnish with Pickles
They are great for a happy hour as one egg is a lot!
Randy
Saturday, February 8, 2014
The Professor's Slaw
As I have been asked for this recipe each and every time I serve it here it is!
The Professor's Slaw Recipe
Ingredients:
1/2 cup mayonnaise
1/3 cup sugar
1/4 cup milk
1/4 cup buttermilk
2 1/2 tablespoons lemon juice
1 1/2 tablespoons white vinegar
1/2 teaspoon salt
1/8 teaspoon pepper
8 cups finely chopped cabbage (approx. 1 head)
1/4 cup shredded carrot (1 medium carrot)
2 tablespoons minced onion
Directions:
* Be sure cabbage and carrots are chopped into very fine pieces (a little bigger than rice)
* Combine the mayonnaise, sugar, milk, buttermilk, lemon juice, vinegar, salt and pepper in large bowl. Beat until smooth
* Add cabbage, carrots, and onions. Mix well.
* Cover and refrigerate for at least 2 hours, if you let it sit over night it's even better
* I like to use a head of both red and yellow cabbage and if you do double the rest of the ingredients and add a small amount at a time until you get the consistency you seek
The Professor's Slaw Recipe
Ingredients:
1/2 cup mayonnaise
1/3 cup sugar
1/4 cup milk
1/4 cup buttermilk
2 1/2 tablespoons lemon juice
1 1/2 tablespoons white vinegar
1/2 teaspoon salt
1/8 teaspoon pepper
8 cups finely chopped cabbage (approx. 1 head)
1/4 cup shredded carrot (1 medium carrot)
2 tablespoons minced onion
Directions:
* Be sure cabbage and carrots are chopped into very fine pieces (a little bigger than rice)
* Combine the mayonnaise, sugar, milk, buttermilk, lemon juice, vinegar, salt and pepper in large bowl. Beat until smooth
* Add cabbage, carrots, and onions. Mix well.
* Cover and refrigerate for at least 2 hours, if you let it sit over night it's even better
* I like to use a head of both red and yellow cabbage and if you do double the rest of the ingredients and add a small amount at a time until you get the consistency you seek
Tuesday, January 28, 2014
Smoked Pepper Jack Bologna
I have been doing a lot of experimenting on my Pit and when I came across this recipe I just had to give it a try. It is not only easy, but very inexpensive for feeding a huge amount of individuals.(Hint: Superbowl Sunday is upon us)
Start with a few nice size logs of bologna which you should be able to get at your local market or butcher shop.
Some Pepper Jack Cheese (I used the generic brand of pepper cheese from the super market)
Take the end off a turkey baster and put at least one core through the center of the bologna log.
Notice: I left the casing on for this step as it makes it much easier.
I also recommend for spicier bologna to make several cores in order to add more cheese
Save the stick you remove from the coring to use a plugs.
Cube some cheese about the same diameter as your core and stuff into the bologna log.
Place the plugs you saved from the previous step in both ends of your core.
Save the rest of the piece you removed from the core and either smoke, grill or fry up quick for a snack while you smoke the bologna logs The make an excellent snack.
Smoke for an hour and a half at 250 then glaze with a hickory sauce*
Take off the smoker and let rest for ten minutes then slice for sandwiches topping with hot mustard and or hot sauce and some sweet onion. I also like to cut into small chunks and server for an appetizer with my smoked cheese.
Sauce recipe I used:
2 tablespoons onion powder
2 tablespoons garlic powder
2 cups ketchup
2 tablespoons smoked sweet smoked paprika (must be sweet smoked)
2/3 cup cider vinegar
2 tablespoons Worcestershire sauce
1/4 cup dark brown sugar
2 tablespoons honey
2 tablespoons maple syrup
2 tablespoons kosher salt
2 tablespoons black pepper
combine in a pot and let simmer all day then let cool for serving (you can also blend all ingredients in a blender first to cut simmer time)
Yes my bologna has a first name and it is awesome!
Happy Smoking
Randy
Start with a few nice size logs of bologna which you should be able to get at your local market or butcher shop.
Some Pepper Jack Cheese (I used the generic brand of pepper cheese from the super market)
Take the end off a turkey baster and put at least one core through the center of the bologna log.
Notice: I left the casing on for this step as it makes it much easier.
I also recommend for spicier bologna to make several cores in order to add more cheese
Save the stick you remove from the coring to use a plugs.
Cube some cheese about the same diameter as your core and stuff into the bologna log.
Place the plugs you saved from the previous step in both ends of your core.
Save the rest of the piece you removed from the core and either smoke, grill or fry up quick for a snack while you smoke the bologna logs The make an excellent snack.
Smoke for an hour and a half at 250 then glaze with a hickory sauce*
Take off the smoker and let rest for ten minutes then slice for sandwiches topping with hot mustard and or hot sauce and some sweet onion. I also like to cut into small chunks and server for an appetizer with my smoked cheese.
Sauce recipe I used:
2 tablespoons onion powder
2 tablespoons garlic powder
2 cups ketchup
2 tablespoons smoked sweet smoked paprika (must be sweet smoked)
2/3 cup cider vinegar
2 tablespoons Worcestershire sauce
1/4 cup dark brown sugar
2 tablespoons honey
2 tablespoons maple syrup
2 tablespoons kosher salt
2 tablespoons black pepper
combine in a pot and let simmer all day then let cool for serving (you can also blend all ingredients in a blender first to cut simmer time)
Yes my bologna has a first name and it is awesome!
Happy Smoking
Randy
Monday, January 6, 2014
Smoking Cheese
Yes you read that right, I just smoked my first cheese on my Pit. I had bee reading about it for awhile and decided to give it a shot.
You can smoke almost any type of cheese so I choose three of my favorites, Gouda, Cheddar and Provolone
The term used when smoking cheese is "Cold Smoking" as you have to keep your pit temp under 90 or your cheese will start to melt.
I simply cut my cheeses in to a few smaller parts as I wanted to use a general purpose rub on a couple of the chunks just for fun.
I let my cheese warm up at room temp for about an hour in order to induce more smoke into the cheese during the process. I put in about half a chimney of charcoal and then put in a large chuck of soaked wood.
I was able to control the temp of my smoke fairly easily with the damper between the firebox and smoker box, however the temp was a cold 29 out so that made this part easier. I would image smoking cheese would be very difficult in warmer weather.
I smoked for about 2 hours and 15 minutes, but I would not hesitate to go longer (up to 3 hours)
Here is the finished product
The Cheese turned out great!
Smoking Eggs
As you can see in the picture above I also like smoking eggs. This process is also very easy and I put the eggs on my pit at the same time the cheese was finishing up.
I get the Pit up to about 250 degrees lay the eggs (pun intended) on the grate and use lots of smoke for about 2 hours..
Here are the finished eggs
These beauties are awesome in Egg Salad and my Smoked Deviled Eggs (see previous post)
Cheers
Randy
You can smoke almost any type of cheese so I choose three of my favorites, Gouda, Cheddar and Provolone
The term used when smoking cheese is "Cold Smoking" as you have to keep your pit temp under 90 or your cheese will start to melt.
I simply cut my cheeses in to a few smaller parts as I wanted to use a general purpose rub on a couple of the chunks just for fun.
I let my cheese warm up at room temp for about an hour in order to induce more smoke into the cheese during the process. I put in about half a chimney of charcoal and then put in a large chuck of soaked wood.
I was able to control the temp of my smoke fairly easily with the damper between the firebox and smoker box, however the temp was a cold 29 out so that made this part easier. I would image smoking cheese would be very difficult in warmer weather.
I smoked for about 2 hours and 15 minutes, but I would not hesitate to go longer (up to 3 hours)
Here is the finished product
The Cheese turned out great!
Smoking Eggs
As you can see in the picture above I also like smoking eggs. This process is also very easy and I put the eggs on my pit at the same time the cheese was finishing up.
I get the Pit up to about 250 degrees lay the eggs (pun intended) on the grate and use lots of smoke for about 2 hours..
Here are the finished eggs
These beauties are awesome in Egg Salad and my Smoked Deviled Eggs (see previous post)
Cheers
Randy
Tuesday, December 10, 2013
Lighting Charcoal
One of my biggest concerns after moving from a propane fired smoker to a wood/charcoal fired pit was the lighting of charcoal. After all I had not used charcoal for grilling or smoking for over 25 years. I knew I did not want to use lighter fluid as my past experience with both lighting and eating food cooked on a grill/pit that was started with lighter fluid had shown my that you could tasted the lighter fluid in the food. I do not care what some of you say this is an indisputable fact and if you say you cannot taste the fluid in the meat, then you have no taste buds left.
I started doing research in advance of my new pit purchase and decided to use a charcoal chimney. Needless to say I was very nervous the day I first fired up my pit, however as you will see here I had absolutely no reason to be concerned.
I choose a large chimney (Weber Brand) and was not sure I really needed one this large, but later I was glad I did.
To light the charcoal in the chimney I followed these steps
Placed three paper towels (you can also use newspaper) in the bottom of the chimney and added a few drops of olive oil. Note: I am doing this in my firebox, however you can also do this in a gravel area, which I typically do for my second batch.
Turn the chimney up right and fill with charcoal. I try to only fill about 75 percent of the chimney.
Then ignite the paper towels in the bottom of the chimney
In a matter of seconds you will have smoke coming out of the top of your chimney
and in no time you will have glowing charcoals. (about 15 minutes average depending on ventilation and draft)
You can then pour the coals in to your fire box and let your pit begin to heat up.
Notice I am using a pit glove for safety and also have both a water hose and fire extinguisher at my disposal.
I can normally get a 250 degree smoker box for around 4 hours out of one chimney full.
As you can see this process is not that difficult and I now really enjoy both grilling and smoking with charcoal.
Cheers
Randy
I started doing research in advance of my new pit purchase and decided to use a charcoal chimney. Needless to say I was very nervous the day I first fired up my pit, however as you will see here I had absolutely no reason to be concerned.
I choose a large chimney (Weber Brand) and was not sure I really needed one this large, but later I was glad I did.
To light the charcoal in the chimney I followed these steps
Placed three paper towels (you can also use newspaper) in the bottom of the chimney and added a few drops of olive oil. Note: I am doing this in my firebox, however you can also do this in a gravel area, which I typically do for my second batch.
Turn the chimney up right and fill with charcoal. I try to only fill about 75 percent of the chimney.
Then ignite the paper towels in the bottom of the chimney
In a matter of seconds you will have smoke coming out of the top of your chimney
and in no time you will have glowing charcoals. (about 15 minutes average depending on ventilation and draft)
You can then pour the coals in to your fire box and let your pit begin to heat up.
Notice I am using a pit glove for safety and also have both a water hose and fire extinguisher at my disposal.
I can normally get a 250 degree smoker box for around 4 hours out of one chimney full.
As you can see this process is not that difficult and I now really enjoy both grilling and smoking with charcoal.
Cheers
Randy
Subscribe to:
Posts (Atom)